

Remnant 2: Forbidden Grove Puzzle Walkthrough: In the vast and captivating world of Remnant 2, players are faced with numerous challenges, from battling fierce enemies to exploring breathtaking landscapes. However, amidst all these trials, the Forbidden Grove Puzzle emerges as a truly enigmatic obstacle, standing out as one of the most perplexing and intriguing puzzles in the game.

As players delve into the Forbidden Grove, they will come across a lever that needs to be activated to power the harp. This is just the beginning of a complex series of steps and clues that must be followed with precision. Inside the Grove, a book reveals cryptic symbols and hints, guiding the player in playing the correct melody on the harp.
In this article, we will guide you through Remnant 2: Forbidden Grove Puzzle Walkthrough. Uncover the location, decode the symbols, and reveal the melody that will unlock the path to your next thrilling encounter—the deadly Ravager boss!
The Forbidden Grove and Its Harp Puzzle in Remnants 2
Located within the world of Yaesha, the Forbidden Grove presents a daunting obstacle that prevents players from engaging in a boss fight in Remnant 2. This obstacle is none other than the Harp puzzle, which guards access to a massive riverway with a perilous gap.
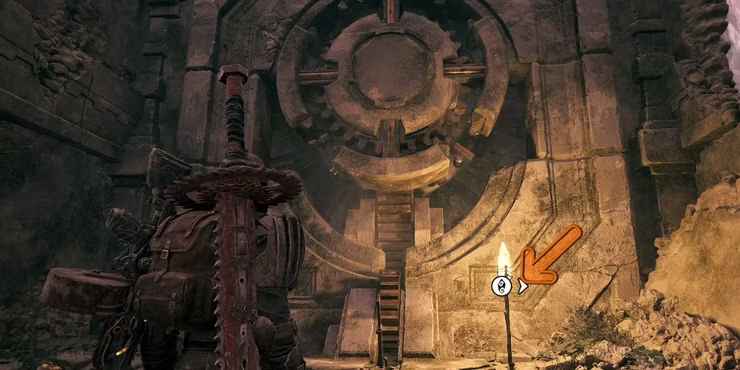
Step 1: Powering the Harp
Before delving into the Harp puzzle, players must first power up the giant harp. To do this, find a lever positioned on the opposite side of the checkpoint room within the Forbidden Grove. With a swift pull, the gear mechanism activates, bringing the harp to life and making the puzzle accessible.
Step 2: Clues from the Book
The next crucial step involves deciphering the clues found in the book near the entrance of the Harp room. The symbols on the left page of the book are of utmost importance as they correspond to the pins on the Harp. These symbols provide essential information about which pins to interact with and the precise spacing required to produce the correct tones.

Step 3: Decoding the Puzzle
The Forbidden Grove Puzzle revolves around five columns of pins on a rotating drum. It may seem intimidating to interpret the musical symbols in the book, but rest assured, the puzzle solution remains consistent for all players.

Step 4: Solving the Puzzle
To ease the process, we have provided a set of points to guide you through the puzzle:
- Pull the pin marked “X” in column 5.
- Leave column 2 empty.
- Pull the pin marked “X” in column 3.
- Leave column 4 empty.
- Pull the pin marked “X” in column 5.
- Pull the pin marked “X” in column 3.
- Pull the pin marked “X” in column 1.
- Leave column 8 empty.
Step 5: Success and Progression
Follow these points carefully, and as you successfully play the melody, a delightful Flute tune will resound. If, by chance, you pull the wrong pin, the song will only play up to that point. Once the correct melody fills the air, a momentous stone bridge descends, granting passage across the treacherous river in the Dense Forest of Yaesha. Prepare yourself for a thrilling confrontation with the deadly boss in Ravager’s Lair.
Conclusion
The Forbidden Grove Puzzle in Remnant 2 adds an exciting layer of challenge and intrigue to your journey. With our step-by-step walkthrough, you can conquer this enigmatic puzzle and continue your quest in the captivating world of Remnant 2.
So, gather your courage, unleash your problem-solving skills, and conquer the Forbidden Grove Puzzle. For more exciting gaming guides, tips, and updates, be sure to visit Gameophobic. The treasures of the Dense Forest of Yaesha await your exploration! Happy gaming!